

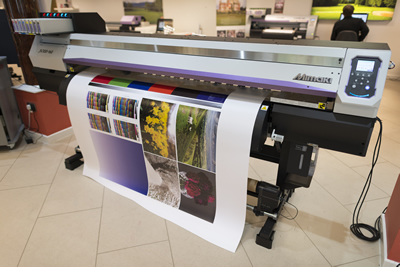
Mimaki launched this solvent printer at the last Fespa Digital show but it’s only recently started appearing in the UK. Here’s how Nessan Cleary found it when he put it to the test.
Solvent technology still dominates the market for roll-fed wide- format printers, mainly because it’s a proven performer that offers good quality results at a reasonable price. So this month we’ve been testing Mimaki’s latest solvent printer, the JV300.
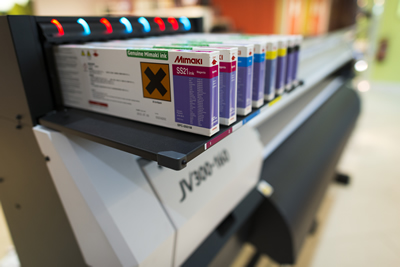
There's a choice of inks, including eco solvent and dye sublimation inksets, but technical sales expert Richard Williams says that 98% of customers opt for the more full-on solvent option, the SS21 ink, adding: “It dries quickly, it’s vibrant and much longer lasting outdoors.” These are light solvent inks, which have a higher loading of solvent than is normal with eco solvent inks. That said, there is no need for additional ventilation assuming the printer’s in a well-ventilated room.
The machine takes two ink cartridges per colour so that there's no need for an internal reservoir - the printer automatically switches to the next cartridge when one empties and the lights above the ink stations change colour to tell you when one cartridge needs changing. It uses two Epson printheads and has a variable drop size from 4 - 35 picolitres, depending on the resolution selected. The heads allow for a certain amount of redundancy to cope with blocked nozzles - roughly 10 nozzles per channel though it depends on how closely they're positioned together. It also uses Mimaki’s Advanced Pass System, which essentially places ink drops between passes to reduce the banding effect at higher speeds.
 Williams says that the printheads last for around three years on average, but that some customers have squeezed up to five years of life out of them. He says that the key to this longevity is cleaning, adding: “It’s just a matter of keeping the machine clean so that no air gets around the cap to harden the ink.”
The cleaning itself involves manually cleaning a wiper blade and the caps in the cleaning station at the right hand end of the carriage. At the left hand end there is a large empty space where the carriage can be parked with plenty of access to the heads themselves for further wiping.
There are three heaters, for preheat, post print, directly underneath where the nozzles are firing, and the platen itself, which has a large area that heats up to 60°C. There are two plugs - one for the heater and one for the printer itself - but both use normal 240v sockets.
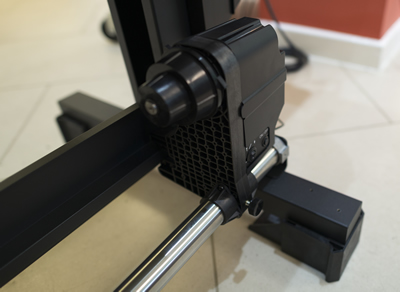
There are a number of other nice touches, such as the rubber caps that go over the castors so that the printer is anchored fairly solidly to the floor. The cutter, which you might normally expect to run from one side to the other, starts in the middle of the carriage and then cuts either side so that the prints don't pull from the roll as they fall away from the machine.
The printer comes with Mimaki's own Rasterlink Rip, which is essentially a Wasatch Rip with a Mimaki interface laid over the top and with Mimaki-developed ICC diffusion patterns. It also has Mimaki media profiles. It will only support Mimaki printers, but each instance can drive up to four devices.
You can gang several jobs together but still have independent profiles for each job, providing they have the same resolution and pass rate. The profiles mainly determine the amount of ink that's going down for the media in use.
It's possible to adjust the amount of ink for the materials being used, but it's not possible to make new profiles. For that Mimaki supplies its own branded ProfileMaker, which is based on X-Rite software.
 The printer has an Ethernet connection and can be networked, as can the Rip server. It’s possible to set up hot folders so that designers can simply drop files into the appropriate folder and they can go straight through to the printer with no operator intervention needed.
All the printer functions can be accessed from the front panel on the machine, or through the Rasterlink Rip. But the front panel features a large friendly smiley face that changes colour to indicate problems.
The JV 300 is available in two sizes - 1.3m which costs £17,995, and the more popular 1.6m, which costs £18,995. However, the printers are sold through dealers who will also charge for installation and training.
It comes with a full set of inks, a powered take-up and the Rasterlink Rip. The price also includes a two-year warranty which covers just about every eventuality, including two printheads per year. The warranty can be extended with a choice of two service level contracts: Gold, which is the same coverage as with the warranty; and Silver, which covers call out and labour charges, with a reduced rate for parts. You can also pay for servicing on an ad hoc basis but warranty customers get priority.
The inks are £89.95 for a 440ml cartridge but you can get a bulk ink solution that takes two litre ink sacks.
ON TEST
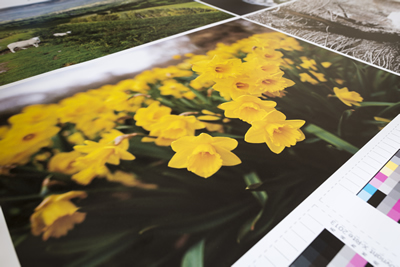
Our normal tests involve printing two A0-sized charts: one with mainly photographs; and one with mainly solid Pantones. We have both charts printed at the highest resolution and again at a standard production speed. This printer was tested at Hybrid Services demo centre, loaded with SS21 inks and for our initial tests we used Metamark MD5 Matte media.
We started off with the highest setting - 720 x 1440dpi, since there's no profile as yet for 1440 x 1440dpi - and using 18 passes bi directional. This mode runs at 6m2/hr, and took 10 minutes 57 seconds for each chart, with the Pantone chart using 18cc and the photograph chart using 10.47cc of ink.
The images were extremely good. The resolution was very good and the colours very bright for both the solid Pantones and all of the photographs. Text was very sharp, easily readable at 4 point and still quite legible at 3 point, though the white on black results were less good, with text only really readable at 6 point, and completely indistinguishable at 4 point.
We also tried a standard production mode - actually we tried most of the print modes available since the JV300 just churned out the prints without missing a beat and with no time spent waiting for it to warm up or cool down. So, for example, at 540 x 720dpi, with four passes bi-directional, each A0 chart took just 2 minutes 16 seconds, with the photograph chart using 9.8cc and the Pantones 14.7cc of ink.
At this resolution the image quality of the photographs chart was very similar to the higher resolution - the colours in the photographs were slightly less vibrant, though this was only really noticeable when comparing the two side by side so I'd have little hesitation using the faster mode for photographic jobs that will be subject to closer viewing. But for the second chart, the solids suffered with poorer resolution and some banding, although these are not noticeable if you step back two feet.
We also tried the faster speeds on a banner material, which was surprisingly good. Williams says that the ability to print good quality banners at higher speeds is important to most customers: “They have got to be competitive because they are competing against the bigger companies with high productivity printers.”
Even at the fastest speed, 105m2/hr or 29 seconds for our A0 prints with 360 x 360dpi and just one pass, the print quality was pretty good. Ink consumption dropped to 9.9cc and the colours were a little duller with a distinct banding, but the text was still legible at 4 point and the banding wasn't noticeable from a short distance away so that this would be perfectly sellable for many outdoor banner applications.
CONCLUSION
The JV300 appears to represent extremely good value for money. The print quality was excellent at the highest resolutions and pretty good at the higher speeds with the fastest banner mode being a revelation, particularly considering the price of the printer.
{jathumbnail off}