
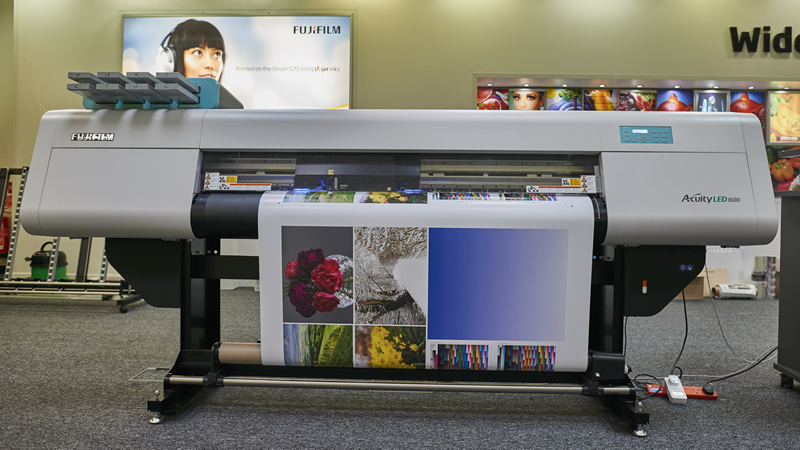
Roll-fed UV printers rely on image quality to justify their price tag but how well does the Acuity 1600 LED acquit itself? Nessan Cleary puts it to the test.
Elsewhere in this issue we’ve looked at UV LED curing so it seemed appropriate to test Fujifilm’s Acuity 1600 LED printer this month. This is a roll-fed UV printer that is based on a Mimaki chassis, though the print engine is all down to Fujifilm. The printheads are Fujifilm Dimatix Q class heads, which are the same industrial class heads used in the more expensive Inca Onset printers that Fujifilm also sells.
The inks and the LED curing system have been developed by Fujifilm’s Speciality Ink Systems division, formerly Sericol. The inks are supplied in 600ml pouches with a chip, which are then loaded into a cartridge, with the cartridges loaded in a unit on the top of the printer.
One of the reasons Fujifilm used LED curing was because the LEDs are lighter than conventional mercury lamps would be, reducing weight and therefore cost from the printhead shuttle. Thus, there are LEDs located at both ends of the shuttle as well as a pining lamp that has to be manually positioned when working with white or clear ink. The LEDs should be good for around 5000 hours, effectively the life of the printer. Martin Burton, manager of Fujifilm UK’s demo centre, says: “The LED gives you a lot of control because it pins and cures very quickly. You can create a matte effect by turning off some of the LED curing.”
The printer takes eight colours - CMYK plus light cyan and light magenta as well as white and clear inks. Burton says: “It’s a very dense white so we don't need many passes.” You can also set the intensity of the ink - it takes a bit of experience with the clear ink to judge how much to put down.
The printer does come with a basic Fuji Rip and there is an option to choose a Caldera Rip, but Fujifilm normally sells it with a Colorgate Rip in the UK. Burton says that this is hot folder-driven so will work with most workflows, adding: “So you could do all the colour management elsewhere and then drop it in a hot folder.”
The Colorgate Rip also has good spot colour control and colour simulation. There's a fair degree of control over the white and clear inks, which can be set up for spot or flood coating and you can choose the sequence such as white ink first followed by CMYK.
Burton says that the UV ink is quite forgiving with most substrates and that most users will get good results with generic profiles. He adds: “It works well with backlit materials because of the opacity of the inks.”
This is a 1.6m wide printer - it takes media up to 1620mm but will only print up to 1610mm and does not offer edge to edge printing. There are pinch rollers at the back that move the media through the printer and there's a vacuum system in the platen that holds the media down. There's a power-driven take-up for the media that helps to keep thinner media, such as window cling films, under tension for better results.
There's an electronic sensor at the back of the platen that detects the height of the media and automatically sets the heads to be 1.5mm above it. However, there's no head guard to prevent damage from, say, a kink in the media. As well as roll-fed media it can also handle rigid substrates up to 13mm thick. There are tables front and back included, which clip quite easily into place.
As for maintenance, Burton says that UV printers are generally easy to keep clean. There’s a capping station on the right side of the printer, complete with a squeegee blade, and Burton advises wiping the heads on a weekly basis. If a nozzle does become blocked it’s possible to just purge the affected head rather than all of them. There's also a manual cleaning area on the left hand side of the printer, where you can reach up underneath the print carriage to each head.
On test
For these tests we use two test charts - one with mainly solid Pantones and one with mainly photographs, which we have printed at both the highest quality mode and a typical production speed to assess the image quality that the printer is capable of and the sort of productivity you can expect from it. Both of these charts are AO size.
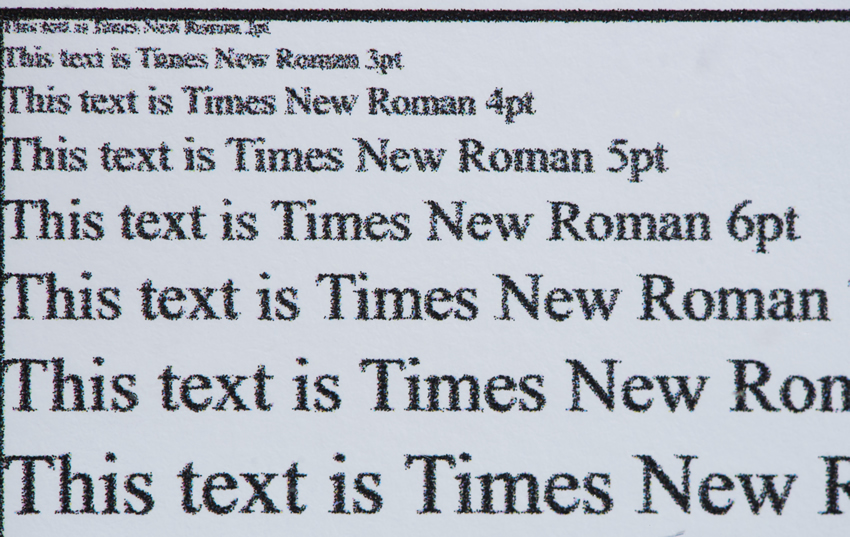
To assess the print quality we used the printer’s High Quality mode, which uses 48 passes at 1200 x 1200dpi, which Fujifilm claims should print at 4.2m2/hr. The Pantone chart took 14.40 minutes, with the photograph chart taking 14.27 minutes. Ink usage was 13.44ml and 10.49ml respectively. The print quality was excellent, with rich deep colours on both test charts. The images were sharp, with text clearly legible down to three point.
However, Burton says that very few people use the High Quality mode, with most using the Standard or Production mode. So, to gauge typical productivity speeds we used the Production quality, which is the printer’s fastest mode and uses 10 passes. It offers 600 x 500dpi resolution and should run at a speed of 20m2/hr. This mode took just 4.33 minutes for the Pantone chart and 4.40 minutes for the photographs. Ink usage also dropped for this mode to 10.69ml and 8.39ml respectively.
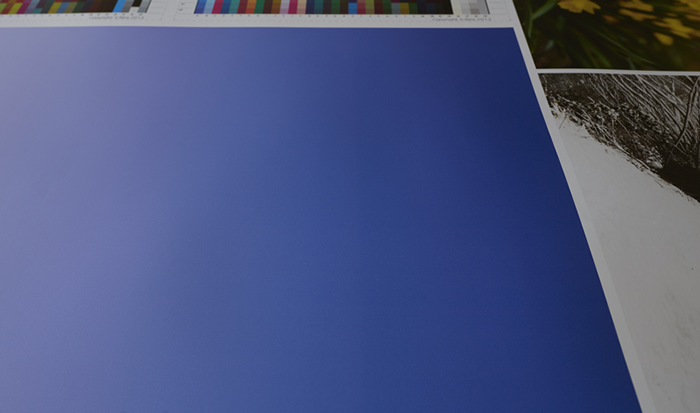
However, the faster speed does come with a penalty in the solids. Thus some of the solid Pantone blocks are a little duller than with the High Quality mode, particularly in the red and orange Pantones. There’s a distinct vertical step in the Reflex Blue gradient towards the denser part of the gradient. There's also horizontal banding in the dark background of one of the photographs. But otherwise the photographs are virtually indistinguishable from the high quality image - there is an added crispness to the photographs in the high quality mode, particularly in the light reds and brighter yellows - but this is only noticeable when the images are viewed side by side. It’s possible that the Standard mode, which runs at 13m3/hr, will deal with these issues, and of course none of them are visible at a normal viewing distance.
Conclusion
The printer costs £39,900, which includes a basic Rip and a 12 month warranty, but not the Colorgate Rip. It’s worth noting that the basic Fujifilm Rip is a rebadged version of Mimaki’s RasterLink Rip, which is a reasonably effective Rip in its own right.
Curiously, Fujifilm wouldn’t give us a price for the inks, saying that it largely depends on the volume that individual customers use. This would suggest some considerable leeway in the price of these inks, which might be down to the mix of customers. The printer is sold more or less equally both to wide format graphics users and packaging companies, where it is used largely for prototypes.
The cost is nearly double what you might pay for a solvent or latex printer. The appeal of this printer lies in the range of media that it will work with, and the image quality. From our test, it’s clear that the printer is capable of quite reasonable print quality. But our tests are designed to handle the majority of printers, without taking into account effects such as white and clear ink. However, from the samples that we’ve seen it seems that this printer really comes into its own when using the white, and particularly the clear ink with its ability to highlight isolated areas of a graphic.
In conclusion, this is neither the cheapest nor the fastest machine for day-to-day signmaking. But it appears to be extremely effective at producing eye-catching prints on a wide range of different media.
Images can be seen in the slideshow, top right.